Preamble
As a member of the infosec dork tribe of the computer yeller nation I have a travel laptop I use for attending conferences, but its intermittent wifi almost torpedoed my presentation at BSides last year so this year I decided a change was in order; luckily being a computer yeller meant I had multiple computers at home I wasn't doing anything with I could use instead.
As an infosec dork I also wanted to build a travel laptop with some infosecsy custom firmware I'd seen presentations about online, but none of my laptops were new enough for someone to have written a security-focused firmware for them - until Heads finally supported the Lenovo X220. After picking up a SOIC-8 clip and using a spare Raspberry Pi as my SPI programmer, all that was left was to crack open the flashing guide and...oh. Guess there'll be more work here than I thought.
Thankfully I managed to find a older guide to flashing coreboot that was functionally equivalent to flashing Heads, but for the sake of C O N T E N T I'm going to make an all-killer-no-filler guide to installing Heads on an X220.
Things You'll Need
- Lenovo X220 (obviously)
- Raspberry Pi with header pins
- SOIC-8 clip
- Jumper cables
- (Optional) USB-serial adapter if you don't want to drive the Pi over SSH
How To Do It
Before flashing the new firmware you'll have to prepare your RPi for SPI flashing duty - this is easiest to do with RPi OS as it has flashrom built in. After installing your OS of choice, add the option dtoverlay=spi0-cs to /boot/config.txt to enable SPI support. Then, download your firmware from Heads CI and optionally validate checksums. Power off the Pi until it is connected to the X220.
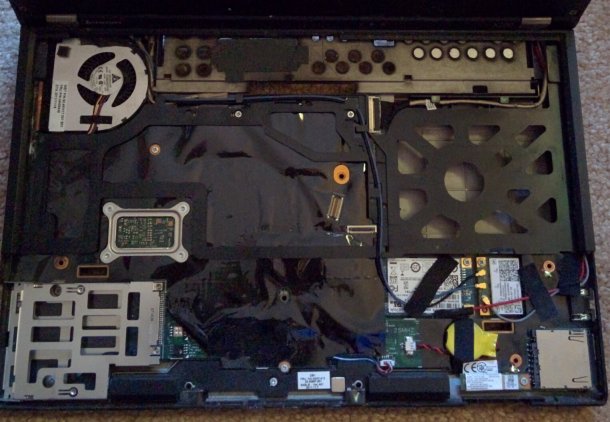
Now the fun begins - after removing the palmrest the SPI flash chip is located at the bottom left of the mainboard, next to the ExpressCard cage and under the black tape.
The chip has this pinout:
 Screen (furthest from you)
           ┌──┐
 MOSI  5 --│  │-- 4  GND
  CLK  6 --│  │-- 3  N/C
  N/C  7 --│  │-- 2  MISO
  VCC  8 --│ o│-- 1  CS
           └──┘
Edge (closest to you)
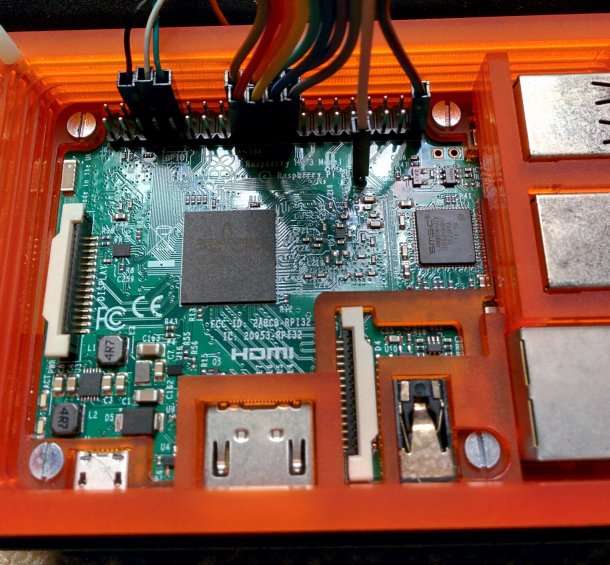
It should be wired to the Pi like so [1]:
  Edge of pi (furthest from you)
L                                                             CS
E                                                             |
F ┌───────────────────────────────────────────────────────────v────────────────────────────────────────────┐
T │    x    x    x    x    x    x    x    x    x    x    x    x    x    x    x    x    x    x    x    x    │
  │    x    x    x    x    x    x    x    x    x    x    x    x    x    x    x    x    x    x    x    x    │
E └────────────────────────────────────────────^────^────^────^───────────────────────────────────────^────┘
D                                              |    |    |    |                                       |
G                                             3.3V  MOSI MISO |                                      GND
E                                           (VCC)            CLK
  Body of Pi (closest to you)
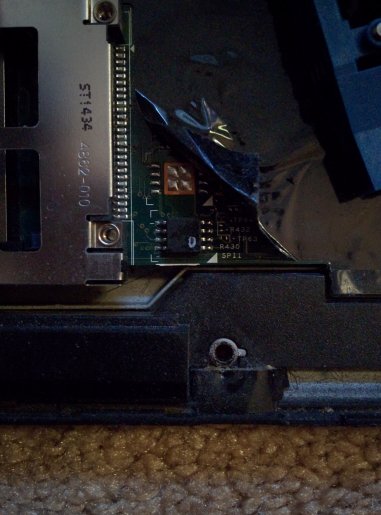
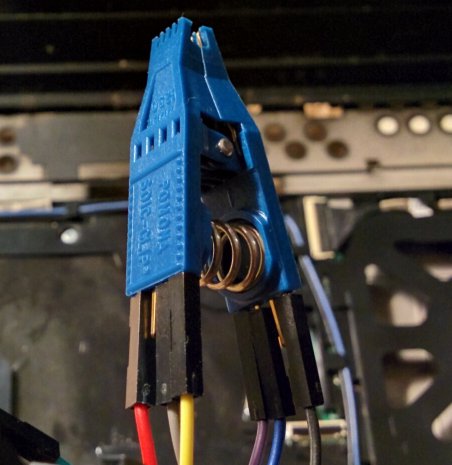
My clip's connection to the chip was kinda finicky, so for me the easiest way to connect everything was to attach the clip to the chip bare and attach the wires in a second step; since I had wires that were attached to each other and didn't want to separate them I found it easiest to insert eight wires on the Pi and only complete the connections I needed on the clip side. [2]
Now you can reboot the Pi, and hopefully see your SPI chip:
pi@pitest:~$ sudo flashrom -p linux_spi:dev=/dev/spidev0.0
flashrom v1.2 on Linux 5.15.84-v8+ (aarch64)
flashrom is free software, get the source code at https://flashrom.org

Using clock_gettime for delay loops (clk_id: 1, resolution: 1ns).
Using default 2000kHz clock. Use 'spispeed' parameter to override.
Found Winbond flash chip "W25Q64.V" (8192 kB, SPI) on linux_spi.
If you can see your chip, next is to make a backup of your current firmware:
pi@pitest:~$ for i in {1..4}; do sudo flashrom -p linux_spi:dev=/dev/spidev0.0 -r rom$i.bin; done; sha256sum rom*
If all the hashes match, you should have a good backup and can write the new firmware to your chip:
pi@pitest:~$ sudo flashrom -p linux_spi:dev=/dev/spidev0.0 -w heads-x220-maximized-v0.2.0-1366-g5b6370c.rom
All that's left is to confirm Heads was written successfully:
pi@pitest:~$ for i in {1..2}; do sudo flashrom -p linux_spi:dev=/dev/spidev0.0 -r flashedrom$i.bin; done; sha256sum flashed* heads*
If the hashes match again, you're done! All that's left to do is install Qubes and wait to flex on people at Hacker Summer Camp.

| [1] | This is a diagram of a 40-pin GPIO board |
| [2] | The three wires on the left are for my USB-serial adapter; you don't have to worry about those |